iOS
Installing Intercom on iOS
Install Intercom to see and talk to users of your iOS app. The Intercom for iOS library supports iOS 8.x and upwards.
Step 1 - Install Intercom
If you’re new to Intercom, you’ll need to create an account and start your free trial. Then you have three options:
Option 1: CocoaPods
Add Intercom to your Podfile and run pod install
target :YourTargetName do
  pod 'Intercom'
end
Option 2. Carthage
- Add github "intercom/intercom-ios" to your Cartfile .
- Run
carthage update. - Go to your Xcode project's "General" settings. Drag Intercom.framework from Carthage/Build/iOS to the "Embedded Binaries" section.
Option 3: Install Intercom manually
- Download Intercom for iOS and extract the zip.
- Go to your Xcode project's "General" settings. Drag
Intercom.frameworkto the "Embedded Binaries" section. Make sure “Copy items if needed” is selected and click Finish. - Finally, you'll need to work around an App Store submission bug. To do this, create a new “Run Script Phase” in your app’s target’s “Build Phases” and paste the following snippet in the script text field:
bash "${BUILT_PRODUCTS_DIR}/${FRAMEWORKS_FOLDER_PATH}/Intercom.framework/strip-frameworks.sh"
Xcode 9 required
Intercom for iOS requires building with Xcode 9, which adds support for iPhone X and iOS 11
Step 2 - Update Info.plist
Add a "Privacy - Photo Library Usage Description" entry to your Info.plist as shown below.

This is required by Apple for all apps that access the photo library. It is necessary when installing Intercom due to the image upload functionality. Users will be prompted for the photo library permission only when they tap the image upload button.
Step 3 - Initialize Intercom
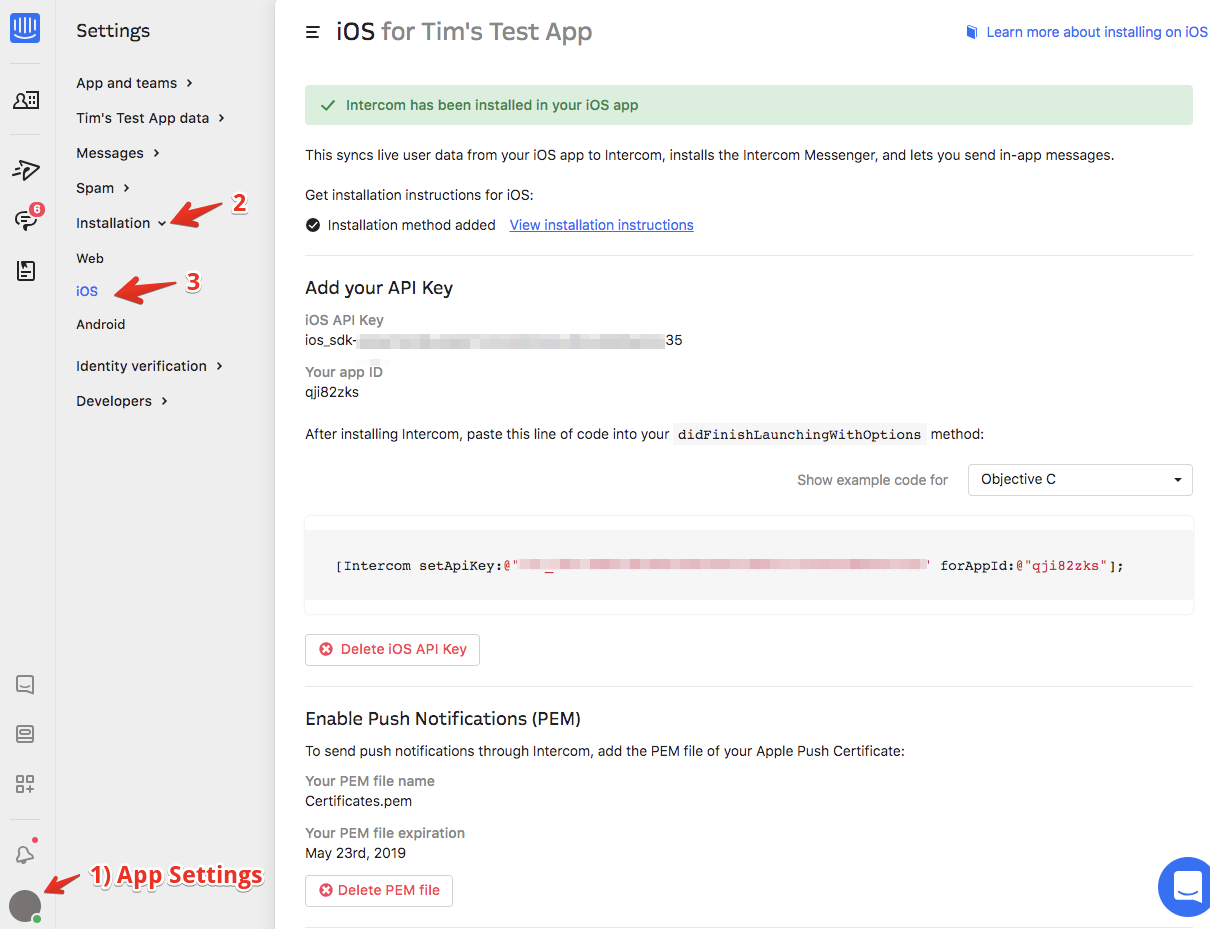
First, you'll need to get your Intercom app ID and iOS API key. To find these, just select the 'Intercom for iOS' option in your app settings.

Then initialize Intercom by importing Intercom and adding the following to your application delegate:
@import Intercom;

- (BOOL)application:(UIApplication *)application didFinishLaunchingWithOptions:(NSDictionary *)launchOptions {
    [Intercom setApiKey:@"<Your iOS API Key>" forAppId:@"<Your App ID>"];
}
import Intercom

func application(_ application: UIApplication, didFinishLaunchingWithOptions launchOptions: [UIApplicationLaunchOptionsKey: Any]?) -> Bool {
     Intercom.setApiKey("<Your iOS API Key>", forAppId: "<Your App ID>")
}
Step 3 - Register your users
You’ll need to register your users with Intercom before you can talk to them or see what they do in your app. Depending on the type of app you have, you can register logged in users of your app, logged out users of your website or both. Here’s tailored instructions for each option:
Register your logged in users
If you have an app with logged in (identified) users only (like Facebook, Instagram or Slack) follow these instructions:
- First, you’ll need to register your user when your app launches, like this:
- (BOOL)application:(UIApplication *)application didFinishLaunchingWithOptions:(NSDictionary *)launchOptions {
    if(loggedIn){
        [Intercom registerUserWithUserId:@"<#123456#>"];
    }
}
func application(_ application: UIApplication, didFinishLaunchingWithOptions launchOptions: [UIApplicationLaunchOptionsKey: Any]?) -> Bool {
    if loggedIn {
      Intercom.registerUser(withUserId: "<#123456#>")
    }
}
If you don't have a unique userId to use here, or if you have a userId and an email you can use
[Intercom registerUserWithEmail:@"[email protected]"];or[Intercom registerUserWithUserId:@"<#123456#>" email:@"[email protected]"];
- You’ll also need to register your user anywhere they log in:
- (void)successfulLogin {
    [Intercom registerUserWithUserId:@"<#123456#>"];
}
func successfulLogin() {
    Intercom.registerUser(withUserId: "<#123456#>")
}
Register your logged out users
If you have an app with logged out (unidentified) users only (like Angry Birds or a flashlight app), follow these instructions:
Just register an unidentified user in your application's delegate, like so:
- (BOOL)application:(UIApplication *)application didFinishLaunchingWithOptions:(NSDictionary *)launchOptions {
    [Intercom registerUnidentifiedUser];
}
func application(_ application: UIApplication, didFinishLaunchingWithOptions launchOptions: [UIApplicationLaunchOptionsKey: Any]?) -> Bool {
     Intercom.registerUnidentifiedUser()
}
Register your logged in and logged out users
If you have an app with both logged in and logged out users (like Google Maps or YouTube), follow these instructions:
- First, you’ll need to register your user when your app launches, like this:
- (BOOL)application:(UIApplication *)application didFinishLaunchingWithOptions:(NSDictionary *)launchOptions {
    if(loggedIn){
        [Intercom registerUserWithUserId:@"<#123456#>"];
    } else {
        [Intercom registerUnidentifiedUser];
    }
}
func application(_ application: UIApplication, didFinishLaunchingWithOptions launchOptions: [UIApplicationLaunchOptionsKey: Any]?) -> Bool {
    if loggedIn {
        Intercom.registerUser(withUserId: "<#123456#>")
    } else {
        Intercom.registerUnidentifiedUser()
    }
}
If you don't have a unique userId to use here, or if you have a userId and an email you can use
[Intercom registerUserWithEmail:@"[email protected]"];or[Intercom registerUserWithUserId:@"<#123456#>" email:@"[email protected]"];
- You’ll also need to register your user anywhere they log in:
- (void)successfulLogin {
    [Intercom registerUserWithUserId:@"<#123456#>"];
}
func successfulLogin() {
     Intercom.registerUser(withUserId: "<#123456#>")
}
How to unregister a user
When users want to log out of your app, simply call:
- (void)logout {
    [Intercom logout];
}
func logout() {
    Intercom.logout()
}
Best practices for registering users
- Don’t use an email address as a userId as this field is unique and cannot be changed or updated later. If you only have an email address, you can just register a user with that.
- If you register users with an email address, the email must be a unique field in your app. Otherwise we won't know which user to update and the mobile integration won't work.
Intercom knows when your app is backgrounded and comes alive again, so you won’t need to re-register your users.
Demo
What next?
- Once you've got Intercom installed it's time to configure it for your iOS app.
- Enable push notifications so you can send push messages.
- Enable Identity Verification for your iOS app.
Updated over 7 years ago